
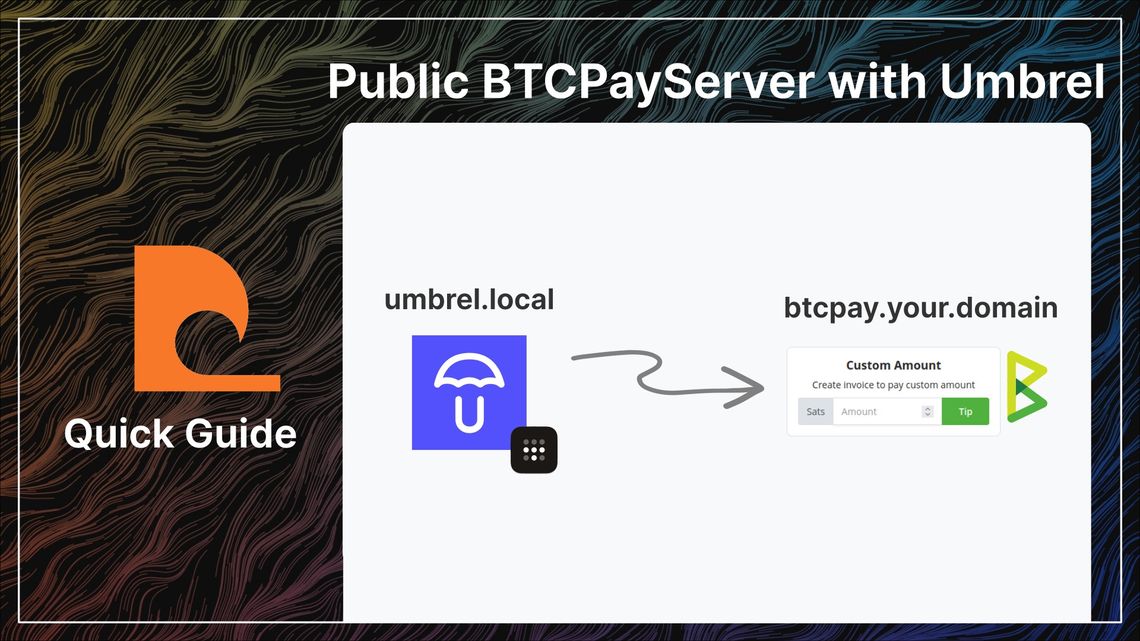
Guide - Public BTCPayServer with Umbrel & Tailscale
What you will do in this guide
- Install Tailscale & BTCPayServer on Umbrel
- Make a Lunanode VPS to relay trafic from a domain to your umbrel
Tailscale
Tailscale connects your online devices together using end to end encryption. It can be used to connect your Umbrel bitcoin node to a cheap VPS, serving your BTCPayServer at your chosen domain.
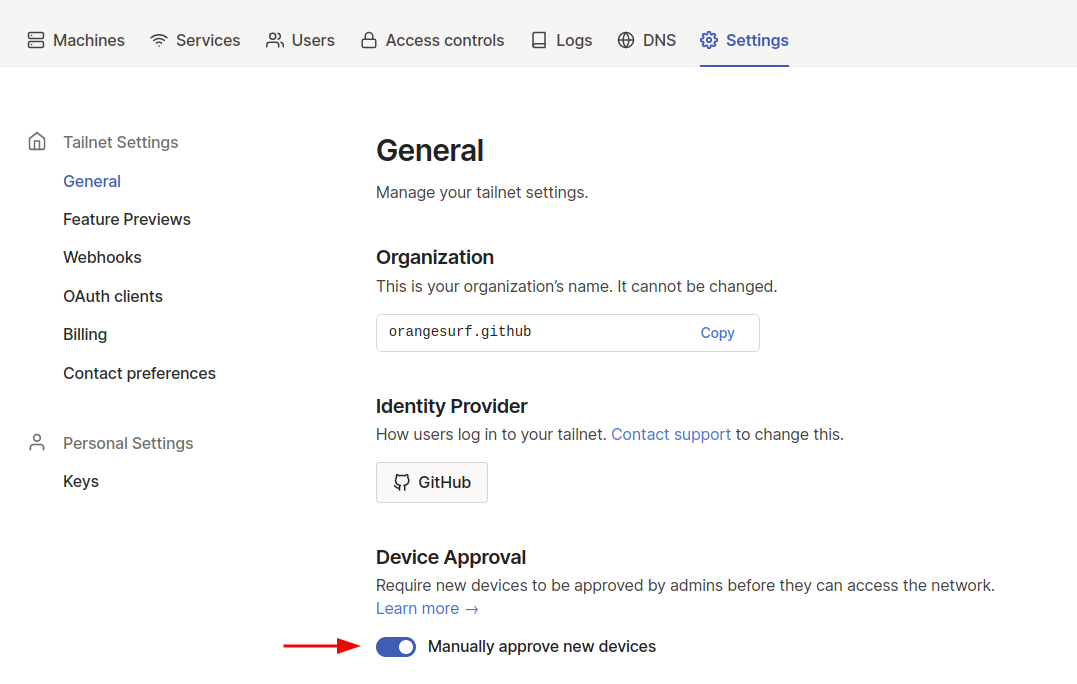
Tailscale Account
Sign up to Tailscale at https://login.tailscale.com.
It is recommended you toggle Manually approve new devices on in the settings.
Umbrel
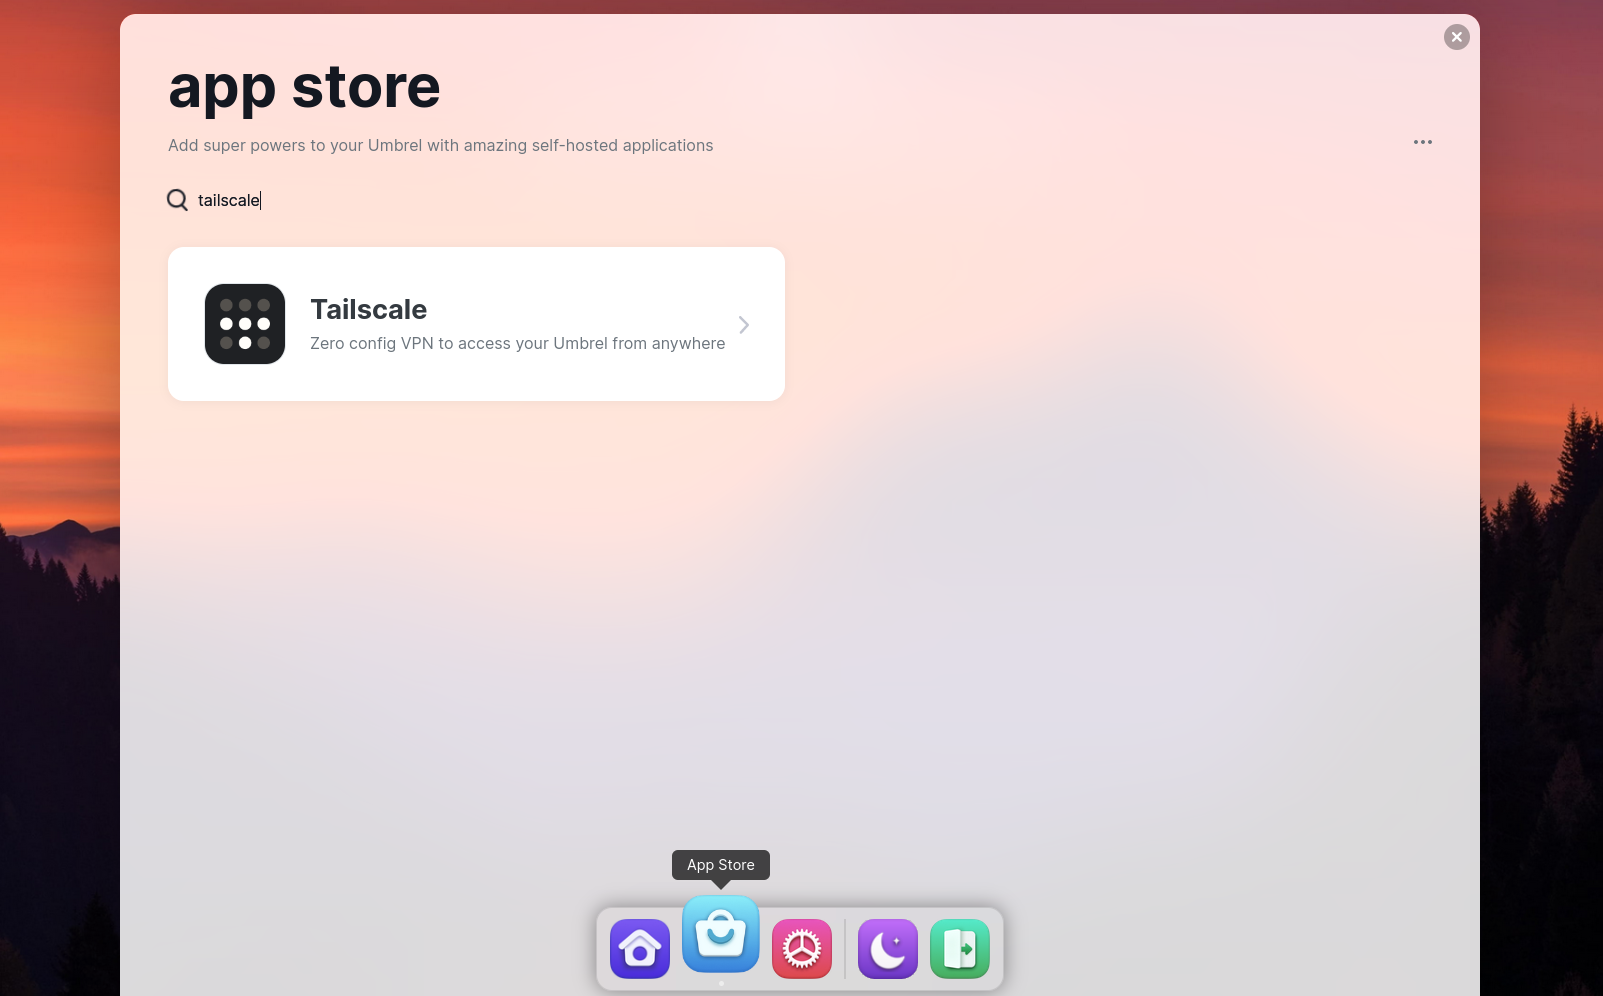
Tailscale App
Install the Tailscale app from the Umbrel app store. Open it and follow the setup (login with your GitHub username and password).
BTCPayServer App
Log into your Umbrel and install BTCPayServer from the Umbrel app store then:
# ssh into your umbrel
ssh umbrel@umbrel.local    (or the IP of your Umbrel server)
# Password is the same as Umbrel Web UI

# Edit the .env.app_proxy file
nano ~/umbrel/app-data/btcpay-server/.env.app_proxy

# Enter the following into the file
PROXY_TRUST_UPSTREAM=true

# Save using:
Control + X, then: Y, then: <enter>

# Restart BTCPayServer
~/umbrel/scripts/app restart btcpay-serverVPS
Sign up for LunaNode and add credit to your account with Bitcoin (Onchain & Lightning are both accepted).
Create a new virtual machine, an m.1s is enough. Select the latest Debian template.
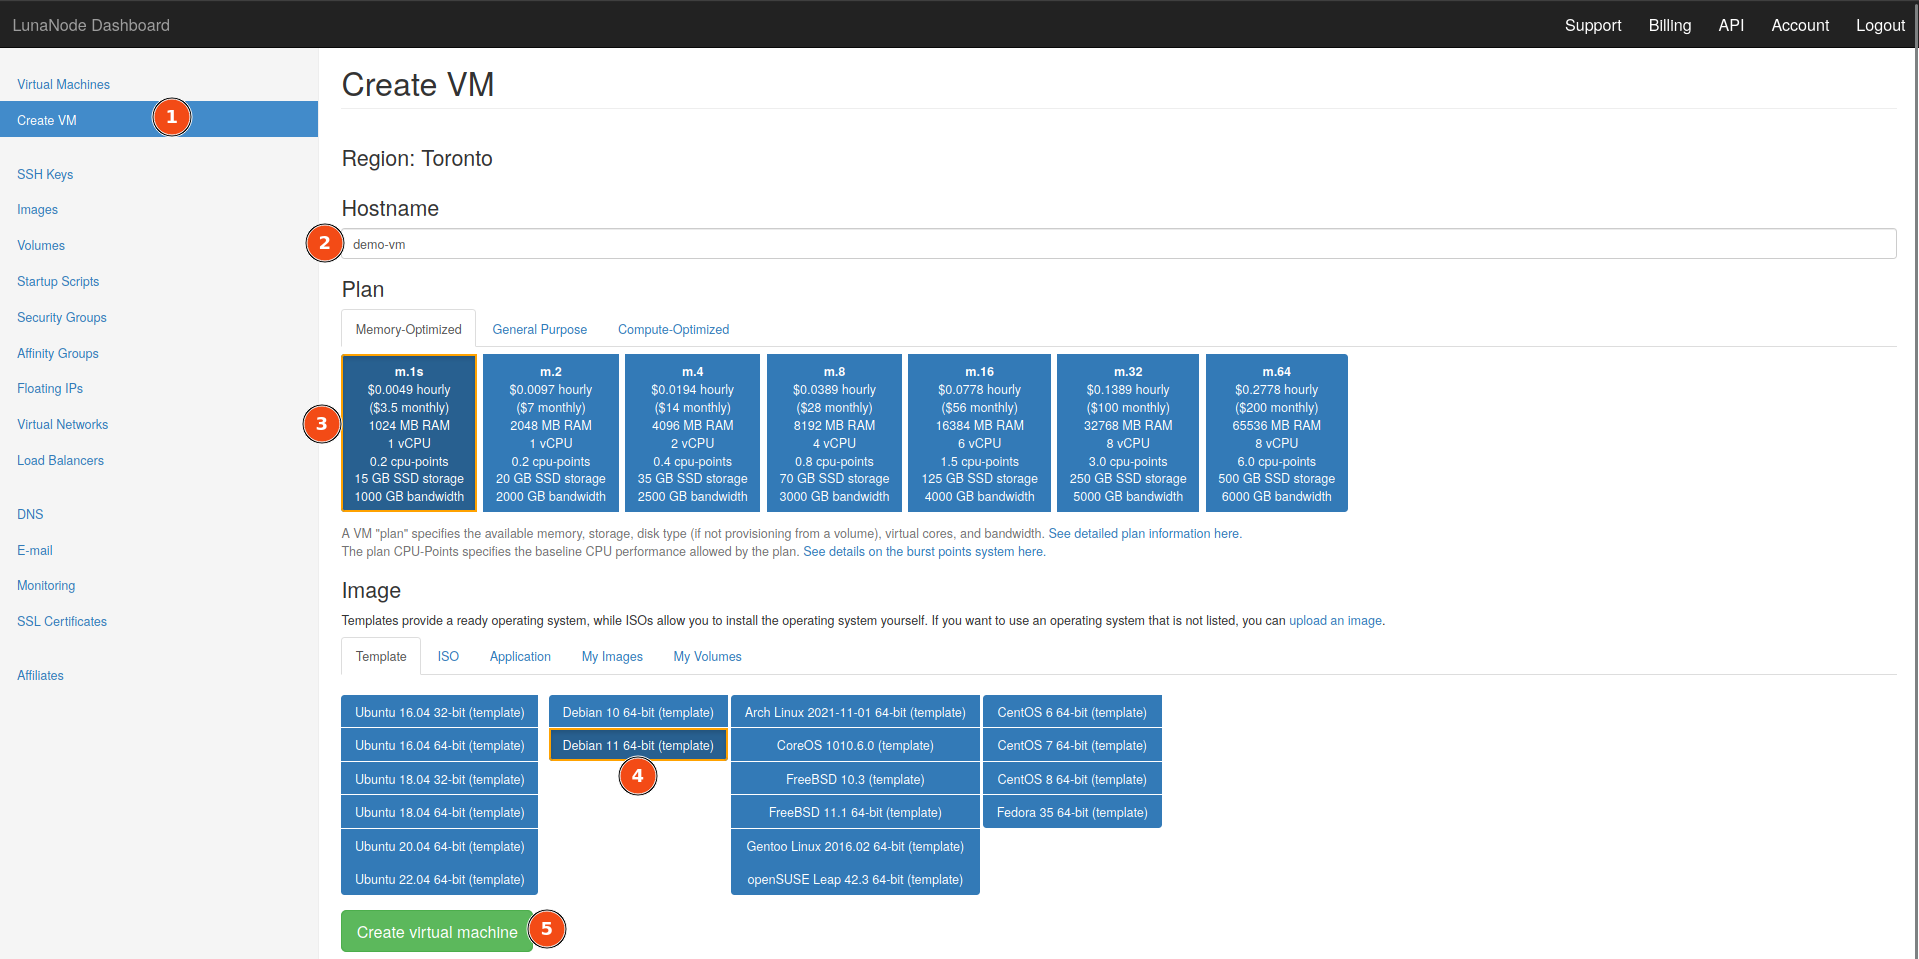
Refresh the page until your Debian VM status is online.
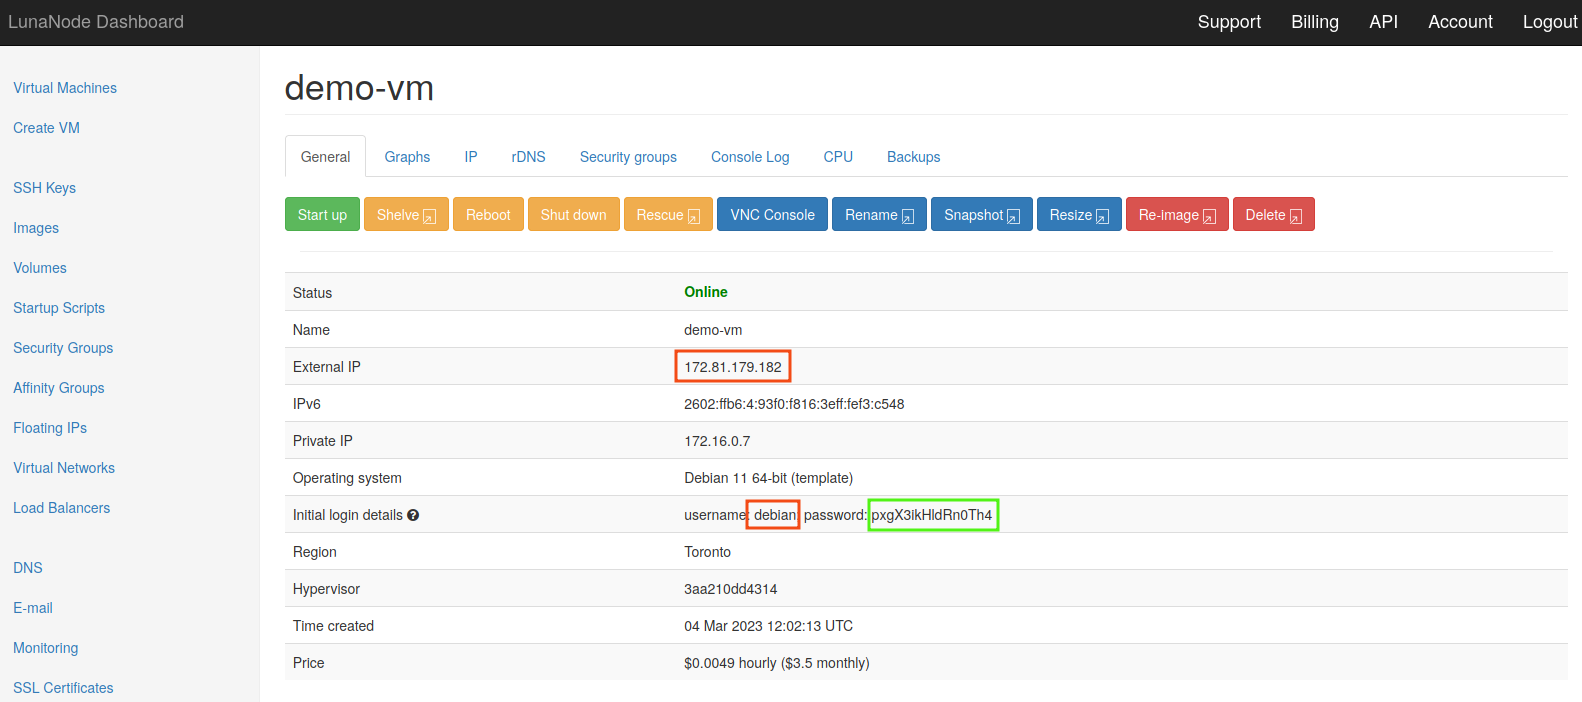
To log in you need the data in the red boxes above in for format username@externalIP (debain@172.81.179.182) and the password in the green box.
# SSH into the VPS
ssh username@externalIP

# switch to root user (if not logged in as root)
sudo su -

# Response will ask for (yes/no/[fingerprint])
yes <enter>

# Response will ask for password
# Enter the password from the green box above
# The password will be invisible while typing / after pastig
<enter>

# install the required dependencies
sudo su
apt update
apt install -y certbot nginx
exit
Install Tailscale
# Download Tailscale for debian
curl -fsSL https://tailscale.com/install.sh | sh

# Wait for "Installation complete! ..."
sudo tailscale up

# Copy authentication URL into browser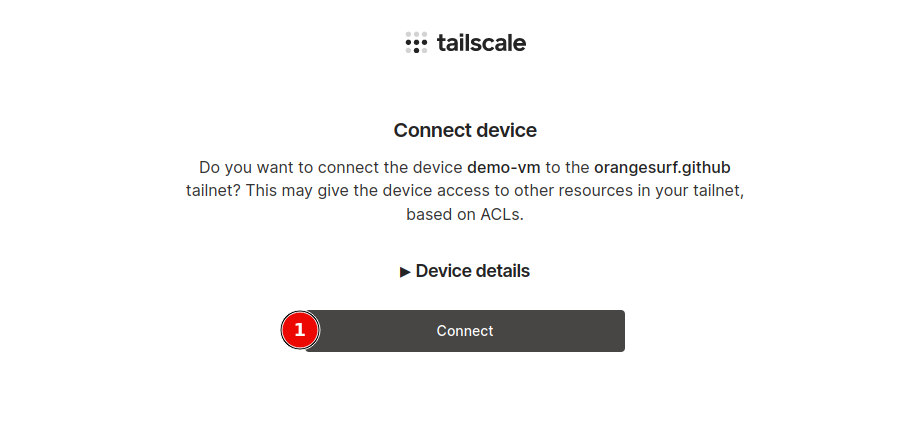
Configure your Domain
Open your domain registrar and edit the DNS records for your domain to include an A-Record from you domain, pointing to the server’s External IP address.

Prepare SSL and Let's Encrypt
# Become root
sudo su

# generate 4096 bit DH params to strengthen the security
# This may take a while, make a coffee
openssl dhparam -out /etc/ssl/certs/dhparam.pem 4096

# create directory for Let's Encrypt files
mkdir -p /var/lib/letsencrypt/.well-known
chgrp www-data /var/lib/letsencrypt
chmod g+s /var/lib/letsencrypt
nginx map.conf
# Create a variable mapping to forward the correct protocol setting and check if the Upgrade header is sent by the client

nano /etc/nginx/conf.d/map.conf

# Enter the snippet in the code block below

# Save using:
Control + X, then: Y, then: <enter>
map $http_x_forwarded_proto $proxy_x_forwarded_proto {
default $http_x_forwarded_proto;
'' $scheme;
}
map $http_upgrade $connection_upgrade {
default upgrade;
'' close;
}
nginx btcpayserver.conf (http)
# Create a config file for the domain
nano /etc/nginx/sites-available/btcpayserver.conf

# Enter the snippet in the code block below

# Save using:
Control + X, then: Y, then: <enter>i.e.
server_name {btcpayserver.mydomain.com}; would become server_name tips.orange.surf;server {
listen 80;
server_name {btcpayserver.mydomain.com};
# Let's Encrypt verification requests
location ^~ /.well-known/acme-challenge/ {
allow all;
root /var/lib/letsencrypt/;
default_type "text/plain";
try_files $uri =404;
}
# Redirect everything else to https
location / {
return 301 https://$server_name$request_uri;
}
}
# Enable the web server config by creating a symlink
ln -s /etc/nginx/sites-available/btcpayserver.conf /etc/nginx/sites-enabled/btcpayserver.conf

# restart nginx:
systemctl restart nginx

# Test your Nginx config
service nginx configtest

# Reload the config
service nginx reload
SSL cert
Run certbot
i.e.
certbot certonly --agree-tos --email adminemail@orange.surf --webroot -w /var/lib/letsencrypt/ -d tips.orange.surfcertbot certonly --agree-tos --email admin@mydomain.com --webroot -w /var/lib/letsencrypt/ -d btcpayserver.mydomain.com
# You should get a response that includes "Congratulations! Your certificate and chain have been saved at..."nginx btcpayserver.conf (https)
# Edit the btcpayserver.conf file to add the https server
nano /etc/nginx/sites-available/btcpayserver.conf

# Add the snippet in the code block below to the end of the file

# Save using:
Control + X, then: Y, then: <enter>
Also replace {umbrel-tailscale-ip:port} with your umbrel tailscale IP address : btcpayserver port number.
i.e.
proxy_pass {umbrel-tailscale-ip:port}; would become proxy_pass http://100.0.0.0:3003;server {
listen 443 ssl http2;
# Replace {btcpayserver.my.domain} with your domain
server_name {btcpayserver.mydomain.com};
ssl_certificate /etc/letsencrypt/live/{btcpayserver.mydomain.com}/fullchain.pem;
ssl_certificate_key /etc/letsencrypt/live/{btcpayserver.mydomain.com}/privkey.pem;
# Replace {umbrel-tailscale-ip:port} with your details
# i.e. http://100.0.0.0:3003
location / {
# URL of BTCPay Server
proxy_pass {umbrel-tailscale-ip:port};
proxy_set_header Host $http_host;
proxy_set_header X-Forwarded-Proto $scheme;
proxy_set_header X-Real-IP $remote_addr;
proxy_set_header X-Forwarded-For $proxy_add_x_forwarded_for;
proxy_set_header Upgrade $http_upgrade;
proxy_http_version 1.1; # ensure replies through domain
# For websockets (used by Ledger hardware wallets)
proxy_set_header Upgrade $http_upgrade;
}
ssl_session_timeout 1d;
ssl_session_cache shared:MozSSL:10m; # about 40000 sessions
ssl_session_tickets off;
# Disable SSL and old TLS versions
ssl_protocols TLSv1.2 TLSv1.3;
# Use Diffie-Hellman (DH) key exchange parameters
ssl_dhparam /etc/ssl/certs/dhparam.pem;
# intermediate configuration
ssl_protocols TLSv1.2 TLSv1.3;
ssl_ciphers ECDHE-ECDSA-AES128-GCM-SHA256:ECDHE-RSA-AES128-GCM-SHA256:ECDHE-ECDSA-AES256-GCM-SHA384:ECDHE-RSA-AES256-GCM-SHA384:ECDHE-ECDSA-CHACHA20-POLY1305:ECDHE-RSA-CHACHA20-POLY1305:DHE-RSA-AES128-GCM-SHA256:DHE-RSA-AES256-GCM-SHA384;
ssl_prefer_server_ciphers off;
# HSTS (ngx_http_headers_module is required) (63072000 seconds)
add_header Strict-Transport-Security "max-age=63072000" always;
}# You should still be root, if not enter sudo su
# Test your Nginx config
service nginx configtest
# Expected result: Testing nginx configuration:.
# If testing fails check {umbrel-tailscale-ip} incudes http://
# Reload the config
service nginx reload
# Restart nginx
systemctl restart nginx
Your domain should now be working.


